WildLens Blog
Camera Gear and Motovlogging Setup
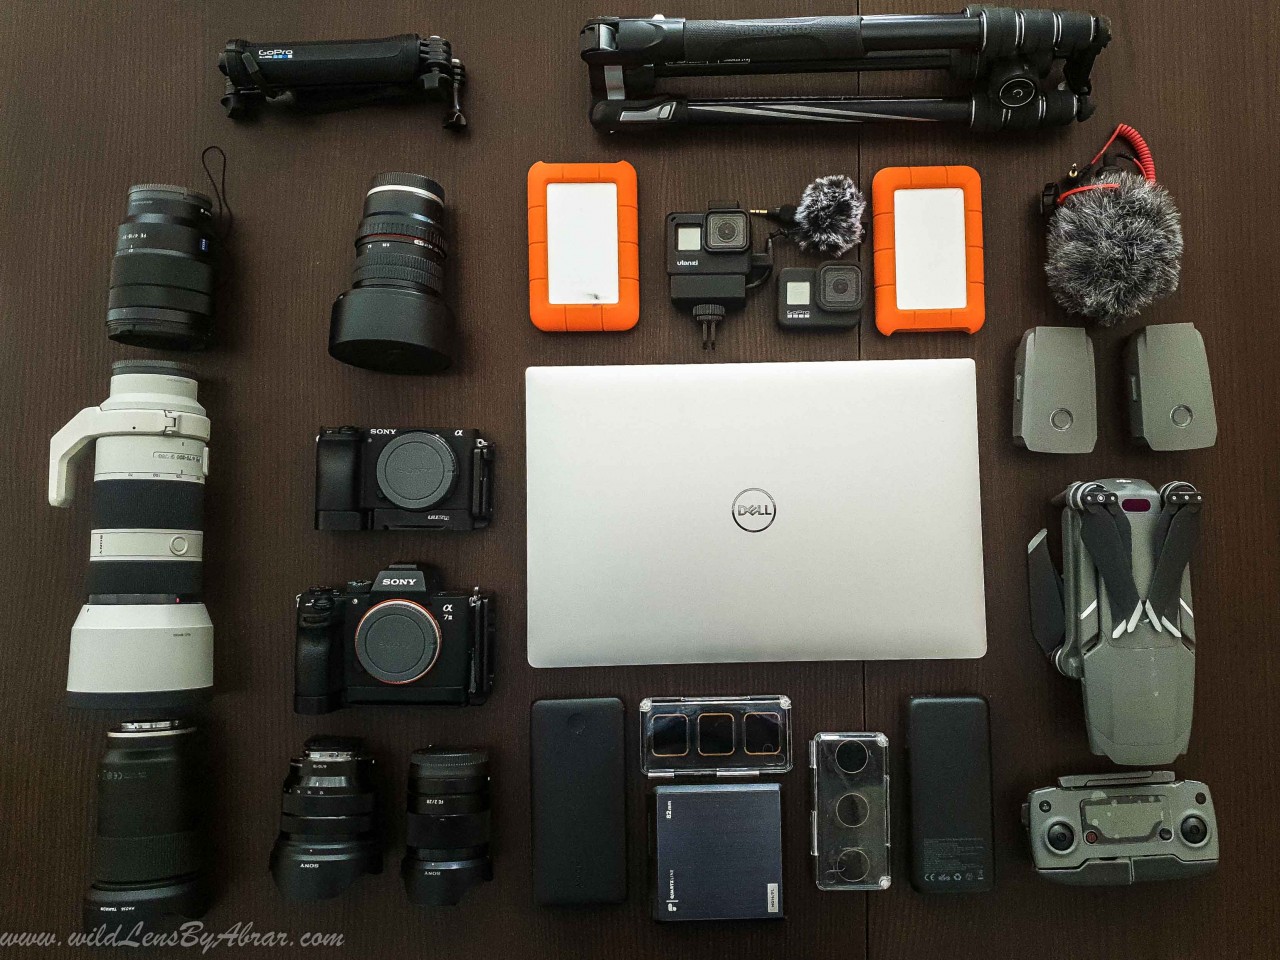
When I started documenting my travels, I started small, with only the basic stuff. Gradually with experience, I kept on adding more equipment as per the requirements. This blog is going to give you a very clear picture of what you might need if you aspire to be a travel Vlogger one day.
1. Camera
a. Sony A7iii
My main Camera is Sony A7iii and I have recorded almost all of my previous vlogs with this camera. These days, I use this camera mainly for taking photographs only. The simple reason behind it is that a wide-angle lens is needed for vlogs whereas capturing a photograph needs one or two different types of lenses depending on the photograph. So, instead of switching between the lenses, I prefer to have a second camera.
Another reason to have a second camera was that Sony A7iii doesn't have a flip screen and its screen can only be tilted to a certain degree. Therefore, in order to record myself, I would have to wait until the recording was complete and then look back in the screen to check if everything went alright. Clearly, it was very time consuming and not comfortable at all.
b. Sony A6400
Sony A6400 is now my choice for main vlog camera along with Sony 10-18mm F4 lens. Both the camera and the lens are lightweight. The key benefit of this lens is Image Stabilization since the camera doesn't offer this feature. Image stabilization is very important for smooth footage. Although I would have preferred an F1.8 or F2.8 lens, F4 is still acceptable and works perfectly for me.
As mentioned earlier, unlike Sony A7iii, Sony A6400 does have a flip screen. I really wanted this feature as I record with manual settings and the flip screen allows me to record in one take.
Sony A6400 also has a cold shoe to attach a microphone on its side which is a very useful feature as a cold shoe on top can block the view of the screen while recording. Other than that, I have installed an L-bracket with both my cameras, which allows me to adjust them in a horizontal as well as a vertical position on a tripod.
2. Microphones
The microphone that I use in my videos is Rode Video Micro. The main reason for this choice is that it doesn't need extra power. All you have to do is to attach this microphone with the camera and you are good to go. Before this, I had Video Micro Pro microphone which used external power and had to be turned On/Off manually. I often forgot to turn it on before recording, only to realize at a later stage that there was no sound and it ruined a few of my vlogs. Besides this feature, it is lightweight, cheap and offers very good sound quality.
I also carry a spare small microphone which is Saramonics SR-XM1. I use it when I don't feel comfortable with Rode Micro which is much bigger in size. Saramonics SR-XM1 is easily attached to the camera and it is a compact vlogging system.
Rode Video Micro microphone is Uni-Directional, meaning that it records sound from one direction only and hence avoids unwanted noise. Saramonics, on the other hand, is Omni-directional which mean that it can catch the sound from surroundings as well. But its quality is still acceptable.
I recently bought Rode Wireless Go as I often feel uncomfortable recording with a big microphone especially in areas like Airport, public transport etc. I like it as it is more discrete and delivers good audio.
3. Lenses
Lenses are the most important and most sensitive piece of my equipment after the camera. The choice of the right lens is very important. I carry a number of lenses with me.
i. With Sony A7iii, I use the Tamron 28-75mm F2.8 lens, mostly for photographs.
ii. As mentioned earlier, most of my previous vlogs were made using Sony Aiii but the lens that I used then, was Sony 16-35mm F4.
iii. I also have a Sony 28mm F2 lens, which is a lightweight lens. I rarely use it these days but I keep it with me nonetheless as it can come handy when needed.
iv. Another lens in my quiver is Sony 70-200mm F4 which is a wonderful lens and photographs taken by it give mind-blowing results, especially in the mountains.
v. For Night Photography or Astro Photography, I use Samyang 14mm F2.8 full-frame. It's a manual lens and is not expensive at all. In my opinion, this is one of the best lenses for night photography. It's the cheapest lens in my camera gear kit with awesome results.
4. Moto Vlogging Setup
On the helmet, I used to have a Dango Design chin mount grip on my helmet but I replaced it with MotoRadds chin mount. I felt very uncomfortable with Dango Design as I couldn't move my head freely and the mount let in much more wind inside the helmet. The microphone is also attached to the back of the mount. Other than these items, I use the products mentioned below:
5. Drone
6. Data Storage
I carry one or two hard drives with me which are Lacie Rugged 5TB devices. These are shockproof which makes them a perfect choice for adventure. Besides hard disk, I also carry some memory cards and a solid-state drive, which are as follows:
i. Sony SSD 1TB (for editing vlogs)
iii. Sandisk Extreme Micro SD
7. Power Banks
I carry one or two power banks with me which are:
ii. RavPower 20,000mA (I can charge my laptop with this power bank)
Since I have spare batteries for most of the equipment, I think carrying one power bank is more than enough.
8. Tripods and Mounts
My Tripod is Manfrotto BeFree, which is very lightweight and ideal for travelling. I also own the Joby Gorilla tripod which gives me a second option as well. I carry some GoPro and camera mounts as well that I keep with me in a separate case in case I need them to give me the option of using the best angles for my cameras.
The details of the mounts and selfie sticks are as follows:
9. ND Filters
ND filters or Neutral Density filters are basic camera add-ons which can turn an average quality video to a high quality cinematic video. I use the following ND filters with my camers:
i. PolarPro GoPro Hero 7 Black
Hopefully, this blog will answer most of your questions. I have also included Amazon associated links of each product and would appreciate it you use those links buy. Feel free to drop any comment and queries. Cheers.


